Bootable NVMe RAID for Linux and Windows
Storage technology has come along way over the years, especially with the advent of affordable NVMe SSDs that directly connect to the PCIe bus for incredibly fast throughput. I was in the market for a new laptop, and noticed that the Dell XPS 17 (2021 edition) sported two NVMe PCI gen 4 drive slots. I bought the XPS 17 with top specs on Dell’s website, but only selected the base 500GB drive, because I had other plans for this. I also purchased two Western Digital SN850 1TB NVMe drives, and when the laptop and drives arrived, promptly installed them into the two PCIe Gen 4 NVMe slots.
I had two requirements that needed to be satisfied for my installation to be considered successful.
- Dual boot compatibility directly from the RAID array, ideally without any non-RAID boot partition
- Performance that is better than a single drive
It turned out to be surprisingly difficult to setup a RAID that boots Linux and Windows. After a few days of trailing many different configurations, I finally landed on the magic one.
Table of Contents
- Introduction
- Prerequisites
- Create the RAID
- Copy the Windows Install to the RAID Array
- Install Ubuntu
- Install GRUB
- Enable RAID boot on Ubuntu
- Benchmarks
- Troubleshooting
Introduction
This guide will show you how to setup a NVMe RAID 0 for Linux and Windows dual boot using Intel VMD RAID.
Software and Hardware Used
Software
- Windows 11
- Ubuntu 21.10
- mdadm - v4.2-rc2 - 2021-08-02
Hardware
- Dell XPS 17 9710
- 2x Western Digital SN 850 1TB NVMe
- Anker NVMe USB enclosure
Why RAID?
RAID (Redundant Array of Inexpensive Disks) is a technology that organizes multiple disks to appear as one disk to an operating system. Different types of RAID arrays can be created that focus on performance, reliability, or a mixture of both. I’m going the performance route, since the RAID I’m setting up will be on a laptop that is regularly backed up. If the RAID dies, it will be an inconvenience, but not the end of the world. I have two NVMe slots available, so the obvious choice for performance would be to create a RAID 0, or striped RAID.
A striped array splits the data into “stripes” across the disks on the the RAID array. Given I have a RAID 0 array of two disks with 128KiB stripes. When I write a 1024KiB file to the disk, the file will be split into 10 alternating stripes, each 128KiB in size. Stripes 1,3,5,7,9 are written to the first disk and stripes 2,4,6,8,10 are written to second disk. Theoretically, performance should be doubled since the reads and writes are being evenly distributed across two disks, doubling the total bandwidth of the data bus connecting the drives, and halving the total access time.
Why Intel VMD RAID?
Intel VMD (Volume Management Device) is firmware based RAID controller built into Intel processors. There are three ways to implement RAID. Each of these methods has a variety of pros and cons, which you can read more about here.
- Hardware RAID
- Dedicated PCIe RAID controller card
- Firmware RAID (fakeRAID)
- Intel VMD
- Software RAID
- Windows Dynamic disk RAID
- Linux MD raid
We are going to use the Intel VMD RAID specifically because of it’s ability to boot directly from RAID partitions. This is possible because the BIOS on machines that support Intel VMD contain UEFI drivers to expose the RAID partitions as normal drives during the boot process, which allows bootloaders like GRUB to be able to read and load the Linux kernel, or load the Windows boot EFI executable.
Outcome of this Guide
You will have a very fast Linux and Windows bootable RAID array using two NVMe SSDs! Windows will mount the RAID array using the Intel VMD drives. Linux will bypass the Intel VMD firmware entirely and mount the array using mdadm, Linux software RAID.
DISCLAIMER
In this guide you will be directly writing to your NVMe storage on the block level. There won’t be any “are you sure messages” or “undo” buttons. If you mistakenly type in the wrong thing, you will permanently lose data.
MAKE BACKUPS OF ANY DATA YOU DON’T WANT TO LOSE!
Prerequisites
Before you get started, you will need have a few things ready.
- Read the disclaimer above.
- Computer that supports Intel VMD and has two NVMe slots.
- Existing SSD with a Windows installation.
- Two blank NVMe drives that are larger than the total capacity of the SSD that contains your existing Windows installation.
- NVMe USB enclosure.
- Ubuntu Live boot USB.
- Internet connection.
Create the RAID
1. Install the new drives
Power off your computer, remove the NVMe drive, and install your two blank NVMe drives. Consult your computer’s service manual if needed on how to properly disassemble it to install the drives. Put the old NVMe drive into your NVMe USB enclosure. I used this one.
2. Provision the RAID 0
Boot up your computer into the BIOS boot menu. Ensure that your BIOS storage configuration is set to “RAID”. Open the Intel VMD RAID configuration menu and create a new RAID array with the below parameters:
- Add both new NVMe drives as members
- RAID 0 (striped)
- Largest chunk size available. We’ll use
128KiBas the chunk size in this guide. - Choose a name that makes sense. We’ll use
nvme_raidin this guide.
3. Write down your configuration
Write down the name and chunk size you selected for the RAID array.
Copy the Windows Install to the RAID Array
4. Boot Ubuntu and install pv and mdadm.
Boot into Ubuntu using the live USB image and connect to the internet. Open a root shell and install mdadm, pv.
sudo su
apt update && apt install pv mdadm
5. Mount the RAID array
Will be manually building the array using mdadm.
First, run lsblk to get the device names of your NVMe drives.
root@ubuntu:/# lsblk
NAME        MAJ:MIN RM   SIZE RO TYPE  MOUNTPOINT
sda           8:0    1  14.4G  0 disk
├─sda1        8:1    1   2.9G  0 part
├─sda2        8:2    1   4.1M  0 part
├─sda3        8:3    1   300K  0 part
└─sda4        8:4    1  11.5G  0 part
nvme0n1     259:0    0 931.5G  0 disk
nvme1n1     259:1    0 931.5G  0 disk
The two devices that start with nvme are the drives that contain your RAID array. It’s important to NOT write to these drives directly. If you do, the RAID array will be destroyed and will need to be recreated in the BIOS setup.
Run the below command using the devices above, and the information you wrote down when creating the RAID array.
[name]Name of the RAID array in the Intel VMD BIOS[number of nvme drives]Number of NVMe devices in your RAID array[RAID Level]0 for RAID 0[RAID chunk size in KiB]Chunk size that was selected in the Intel VMD BIOS[first NVMe disk]Device name of your first NVMe disk[second NVMe disk]Device name of your second NVMe disk
mdadm --build /dev/md/[name] \
  --raid-devices=[number of nvme drives] \
  --level=[RAID Level] \
  --chunk=[RAID chunk size in KiB] \
  /dev/[first NVMe disk] \
  /dev/[second NVMe disk]

# EXAMPLE:
# mdadm --build \
# /dev/md/nvme_raid \
# --raid-devices=2 \
# --level=0 \
# --chunk=128 \
# /dev/nvme0n1 \
# /dev/nvme1n1
Write down the command because you will need it later.
If that was successful, you should see the RAID device in lsblk.
root@XPS-17-9710:/# lsblk
NAME        MAJ:MIN RM   SIZE RO TYPE  MOUNTPOINT
sda           8:0    1  14.4G  0 disk
├─sda1        8:1    1   2.9G  0 part
├─sda2        8:2    1   4.1M  0 part
├─sda3        8:3    1   300K  0 part
└─sda4        8:4    1  11.5G  0 part
nvme0n1     259:0    0 931.5G  0 disk
└─md127       9:127  0   1.8T  0 raid0
nvme1n1     259:1    0 931.5G  0 disk
└─md127       9:127  0   1.8T  0 raid0
In our case the RAID array is showing as /dev/md127.
6. Copy the Windows Installation to the RAID
Plug in the NVMe USB enclosure that has your Windows installation. Run lsblk to get the device name of the enclosure.
root@XPS-17-9710:/# lsblk
NAME        MAJ:MIN RM   SIZE RO TYPE  MOUNTPOINT
sda           8:16   1  14.4G  0 disk
├─sda1        8:17   1   2.9G  0 part
├─sda2        8:18   1   4.1M  0 part
├─sda3        8:19   1   300K  0 part
└─sda4        8:20   1  11.5G  0 part
sdb           8:0    0 476.9G  0 disk
├─sdb1        8:1    0   200M  0 part
├─sdb2        8:2    0   128M  0 part
├─sdb3        8:3    0 458.5G  0 part
├─sdb4        8:4    0   990M  0 part
├─sdb5        8:5    0  15.8G  0 part
└─sdb6        8:6    0   1.4G  0 part
nvme0n1     259:0    0 931.5G  0 disk
└─md127       9:127  0   1.8T  0 raid0
nvme1n1     259:1    0 931.5G  0 disk
└─md127       9:127  0   1.8T  0 raid0
In our case, the NVMe enclosure is showing up as /dev/sdb.
Now for the dangerous part. We will be copying the entire Windows SSD to the RAID array block for block. If you mess up this command, you could end up completely deleting your Windows installation, or any other devices attached to your computer.
Run the below command to clone your Windows SSD to the RAID array.
[NVMe enclosure]The device name of your NVMe enclosure./dev/sdbin this example.[RAID array]The device name of your RAID array./dev/md127in this example.
# WARNING: DANGEROUS COMMAND!

pv < [NVMe enclosure] > [RAID array]

# EXAMPLE:
# pv < /dev/sdb > /dev/md127
7. Create the Linux Partition
When the pv command has completed, open gparted.
gparted
gparted will display a message asking to correct the partition table size. Click fix to expand the partition table to fill the capacity of the RAID array.
Create a new primary partition on the RAID array. This is where you will be installing Linux.
You can move around the partitions as needed. My Windows install was on a 500GB NVMe drive, and the two new drives comprised a 2TB RAID array. I partitioned 1TB at the end of the array for Linux, and expanded the Windows partition using MiniTool in Windows. Originally, I tried to expand the Windows data partition in gparted, but the NTFS filesystem was corrupted when expanding, so I was forced to use a Windows tool for this.
8. Reboot and try Windows
Shutdown Ubuntu, unplug the NVMe enclosure and live USB, reboot, and open your BIOS boot menu. You should see the Windows boot loader as an option.
Select the Windows bootloader, and hold F8 to open the boot options menu in Windows. Select “Safe Mode” and continue to boot. After Windows has booted, any RAID drivers should now be loaded and you can reboot normally into Windows. Booting into Safe Mode allows Windows to reinstall any storage drivers, which will be needed if your computer was previously set to AHCI mode as opposed to RAID mode.
Install Ubuntu
9. Run the Ubuntu Installer
Boot into the Ubuntu live USB, connect to the internet, install mdadm, and your favorite text editor. I’m using vim in this guide.
sudo su
apt update && apt install mdadm vim
Mount the raid array using the command you wrote down in the steps above.
Example:
mdadm --build /dev/md/nvme_raid --raid-devices=2 --level=0 --chunk=128 /dev/nvme0n1 /dev/nvme1n1
Run lsblk to verify that the RAID has mounted. You should see the Windows partitions and the new Linux partition you created in the above steps.
 root@XPS-17-9710:/# lsblk
 NAME        MAJ:MIN RM   SIZE RO TYPE  MOUNTPOINT
 sda           8:0    1  14.4G  0 disk
 ├─sda1        8:1    1   2.9G  0 part
 ├─sda2        8:2    1   4.1M  0 part
 ├─sda3        8:3    1   300K  0 part
 └─sda4        8:4    1  11.5G  0 part
 nvme0n1     259:0    0 931.5G  0 disk
 └─md127       9:127  0   1.8T  0 raid0
   ├─md127p1 259:2    0   200M  0 part
   ├─md127p2 259:3    0   128M  0 part
   ├─md127p3 259:4    0 930.6G  0 part
   ├─md127p4 259:5    0   990M  0 part
   ├─md127p5 259:6    0  15.8G  0 part
   ├─md127p6 259:7    0   1.4G  0 part
   └─md127p7 259:8    0 913.9G  0 part
 nvme1n1     259:1    0 931.5G  0 disk
 └─md127       9:127  0   1.8T  0 raid0
   ├─md127p1 259:2    0   200M  0 part
   ├─md127p2 259:3    0   128M  0 part
   ├─md127p3 259:4    0 930.6G  0 part
   ├─md127p4 259:5    0   990M  0 part
   ├─md127p5 259:6    0  15.8G  0 part
   ├─md127p6 259:7    0   1.4G  0 part
   └─md127p7 259:8    0 913.9G  0 part
In my case above:
- EFI partition is
/dev/md127p1 - Windows and Dell partitions are
/dev/md127p[2-6] - Linux partition is
/dev/md127p7
Open the Ubuntu installer and begin the installation. When asked where you would like to install Ubuntu, select “Something Else”. Select your Linux partition as EXT4 and as the root mount point. For the bootloader installation, select your EFI partition. The Ubuntu installer should recognize the EFI partition, but if it does not, it can be identified by mounting and checking if the /EFI directory exists.
Write down the device name of your Linux install and EFI partition.
Complete the install steps. The installer will likely fail at the grub-install step, but this is fine, since we’ll be manually installing GRUB.
Do not reboot after the installation since we’ll need to do a few more things to install Grub.
Install GRUB
GRUB is the bootloader that we will be using to dual boot Windows and Linux.
10. Install the GRUB EFI Binary
First mount the USB EFI partition, RAID EFI partition, and Linux install on your RAID. Then run lsblk -o name,uuid,mountpoint to get the UUIDs of each partition you mounted.
root@XPS-17-9710:/# mkdir /mnt/usb_efi
root@XPS-17-9710:/# mkdir /mnt/raid_efi
root@XPS-17-9710:/# mkdir /mnt/linux_install
root@XPS-17-9710:/# mount /dev/sda2 /mnt/usb_efi
root@XPS-17-9710:/# mount /dev/md127p1 /mnt/raid_efi
root@XPS-17-9710:/# mount /dev/md127p7 /mnt/linux_install
root@XPS-17-9710:/# lsblk -o name,uuid,mountpoint
NAME        UUID                                 MOUNTPOINT
sda         2021-10-12-21-08-32-00
├─sda1      2021-10-12-21-08-32-00
├─sda2      EB63-1DAE                            /mnt/usb_efi
├─sda3
└─sda4      d06bb669-6884-4f52-accf-e1d98c6955c4
nvme0n1
└─md127
  ├─md127p1 4C0A-A6A9                            /mnt/raid_efi
  ├─md127p2
  ├─md127p3 01D80AAB4C837A80
  ├─md127p4 AEFA627CFA6240A7
  ├─md127p5 86306283306279D7
  ├─md127p6 F22008112007DB8B
  └─md127p7 975f3c72-e3c2-414f-9dbc-a8a7ece326d6 /mnt/linux_install
nvme1n1
└─md127
  ├─md127p1 4C0A-A6A9                            /mnt/raid_efi
  ├─md127p2
  ├─md127p3 01D80AAB4C837A80
  ├─md127p4 AEFA627CFA6240A7
  ├─md127p5 86306283306279D7
  ├─md127p6 F22008112007DB8B
  └─md127p7 975f3c72-e3c2-414f-9dbc-a8a7ece326d6 /mnt/linux_install
In my case:
- Live USB EFI partition is on
/dev/sda2with UUIDEB63-1DAE - RAID EFI partition is on
/dev/md127p1with UUID4C0A-A6A9 - Linux is on
/dev/md127p7with UUID975f3c72-e3c2-414f-9dbc-a8a7ece326d6
Copy the GRUB EFU binaries from the Ubuntu live USB EFI partition to your EFI partition on your RAID array.
cp -r /mnt/usb_efi/EFI/ /mnt/raid_efi/EFI/
11. Create and Install the GRUB configuration
Make the GRUB configuration directory path on your RAID EFI partition, and open your favorite text editor to edit the GRUB config.
   mkdir /mnt/raid_efi/EFI/boot/grub
   vim /mnt/raid_efi/EFI/boot/grub/grub.cfg
You can copy and paste the below example into your text editor.
- Required updates
- Replace last number in
hd0,gpt1with the partition number of your EFI partition. - Replace last number in
hd0,gpt7with the partition number of your Linux install.- (i.e. if your Linux partition is
/dev/md127p7, your partition is number7on the RAID array).
- (i.e. if your Linux partition is
- Replace
975f3c72-e3c2-414f-9dbc-a8a7ece326d6with the UUID of your Linux install. - Replace
4C0A-A6A9with the UUID of your EFI partition.
- Replace last number in
- Optional updates
- Update the
set timeout=1value to how long you wish the boot menu to display when booting - Remove the instances of
savedefaultin the menu entries to prevent your previous boot from being saved as the default for the next boot.
- Update the
set timeout=1
set menu_color_normal=white/black
set menu_color_highlight=black/light-gray

if [ -s $prefix/grubenv ]; then
  set have_grubenv=true
  load_env
  set default="${saved_entry}"
fi
function savedefault {
  saved_entry="${chosen}"
  save_env saved_entry
}

menuentry "Linux" {
  savedefault
  insmod ext2
  search --no-floppy --fs-uuid --set=root --hint-efi=hd0,gpt7 975f3c72-e3c2-414f-9dbc-a8a7ece326d6
  linux /boot/vmlinuz root=UUID=975f3c72-e3c2-414f-9dbc-a8a7ece326d6 intel_iommu=on iommu=pt
  initrd /boot/initrd.img
}

menuentry "Windows" {
  savedefault
  insmod part_gpt
  insmod fat
  insmod chain
  search --no-floppy --fs-uuid --set=root --hint-efi=hd0,gpt1 4C0A-A6A9
  chainloader /EFI/Microsoft/Boot/bootmgfw.efi
}

menuentry 'UEFI Firmware Settings' $menuentry_id_option 'uefi-firmware' {
  fwsetup
}
Save and close the text editor.
Enable RAID boot on Ubuntu
You will need to manually install mdadm and add an init-premount script to your new Ubuntu installation.
12. Install mdadm on your new Ubuntu install
Using the Linux mount point you created above, bind the Linux system directories, and chroot into your new Linux install. This will allow you to install packages and make configuration changes as if you were booted into your new Linux install.
mount /dev/md127p7 /mnt/linux_install
mount --bind /dev /mnt/linux_install/dev
mount --bind /proc /mnt/linux_install/proc
mount --bind /sys /mnt/linux_install/sys
mount --bind /rub /mnt/linux_install/run
chroot /mnt/linux_install
Install mdadm
apt update && apt install mdadm
If you get DNS errors, add a DNS name server to your resolv.conf, and re-run the apt comamnds.
echo "nameserver 1.1.1.1" >> /etc/resolv.conf
Now, install the init-premount script. This will make sure the MD RAID is mounted before Linux attempts to access the root directory.
vim /etc/initramfs-tools/scripts/init-premount/mdadm
Copy the mdadm mount command you have been using to mount the RAID array. It’s important to note that you need to specify the absolute path to the mdadm binary.
#!/bin/sh
PREREQ=""
prereqs()
{
     echo "$PREREQ"
}

case $1 in
prereqs)
     prereqs
     exit 0
     ;;
esac

/usr/sbin/mdadm [mdadm options go here]

exit 0
Save and close your text editor.
Update your kernal initramfs image to install the pre-mount script.
update-initramfs -u -k all
Reboot and remove the live USB and any other drives you have connected.
Open the BIOS boot menu and select the Intel VMD RAID as your boot device.
Exit your BIOS setup and proceed to boot to GRUB.
Congratulations, you’re done!
If you have any issues, proceed to the Troubleshooting section below.
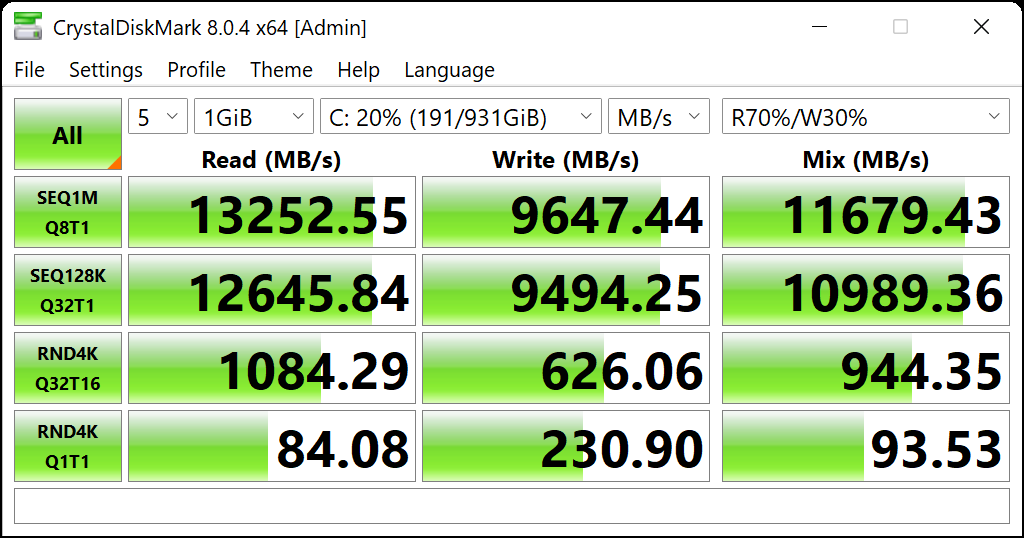
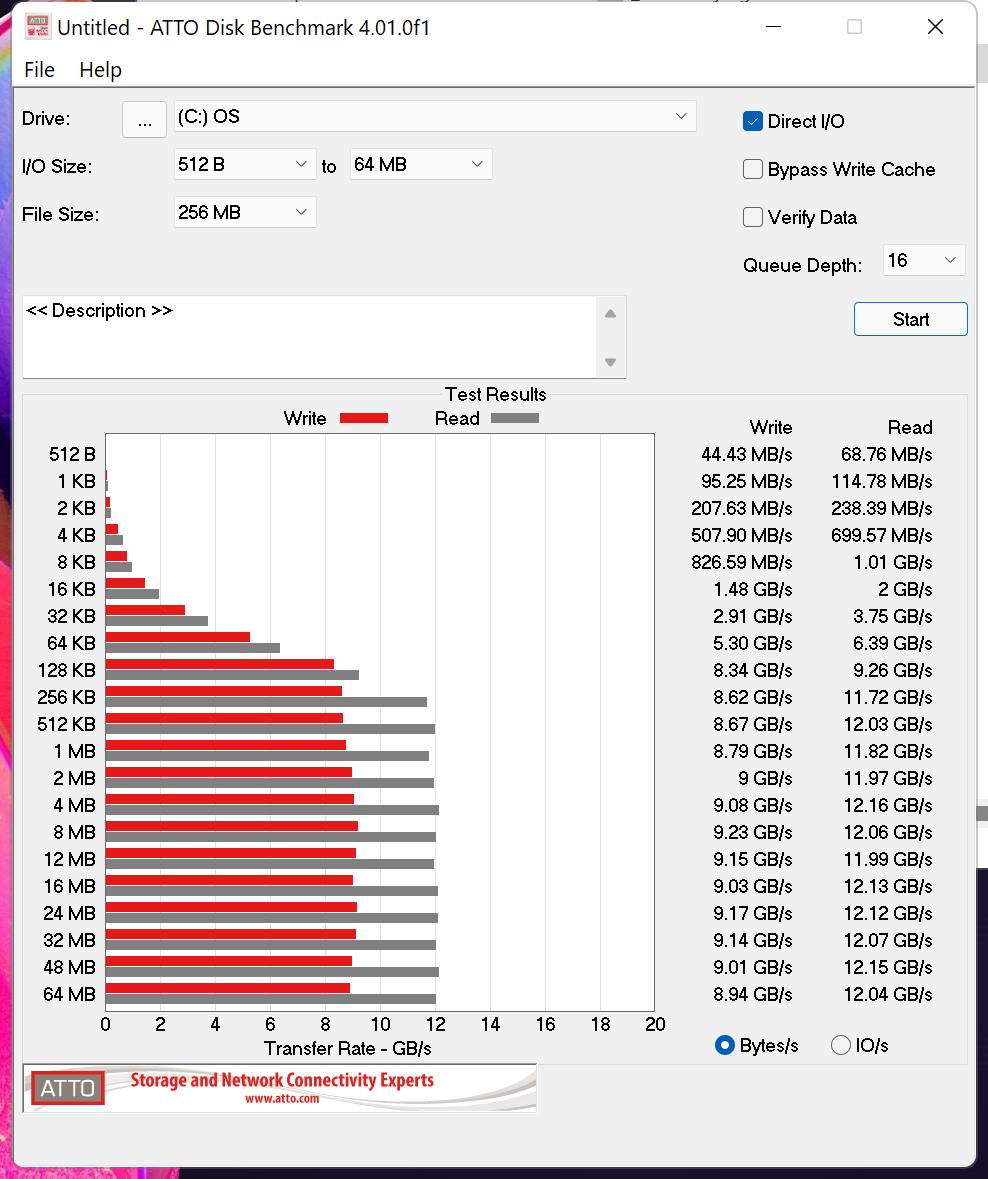
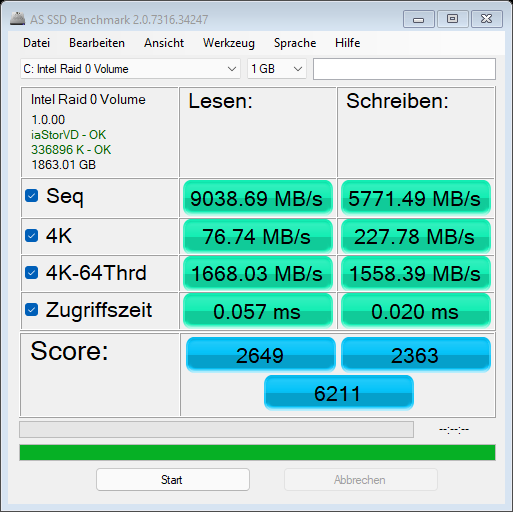
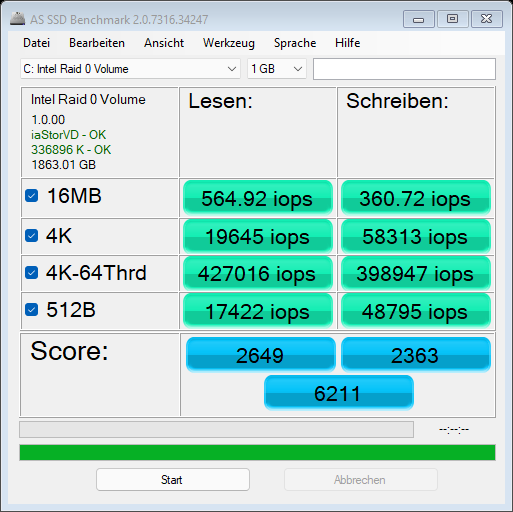
Benchmarks
Once you’ve booted into both environments, you can take a few benchmarks to see if the RAID is performing to your expectations.
Here are a few benchmarks I gathered from my setup. I was very happy with the results.
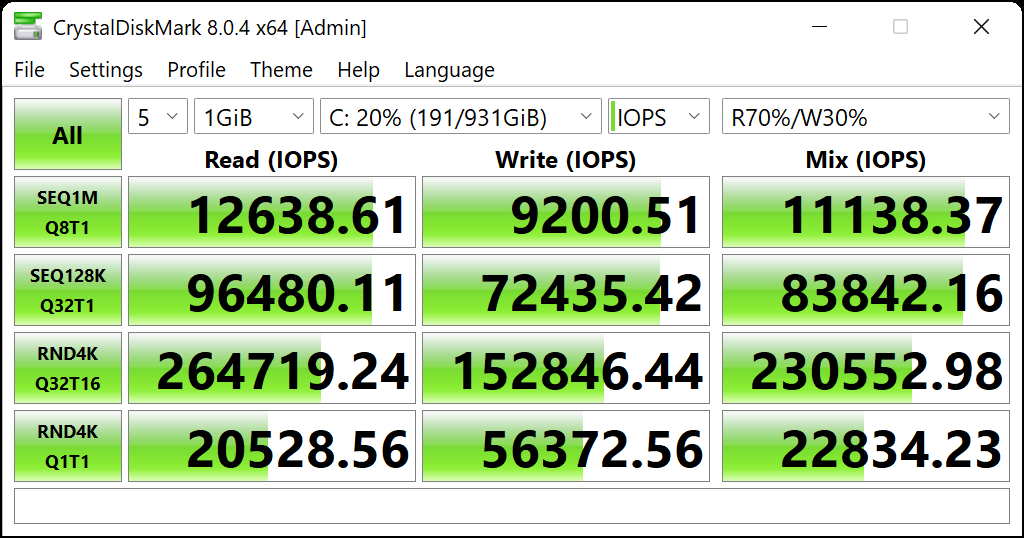
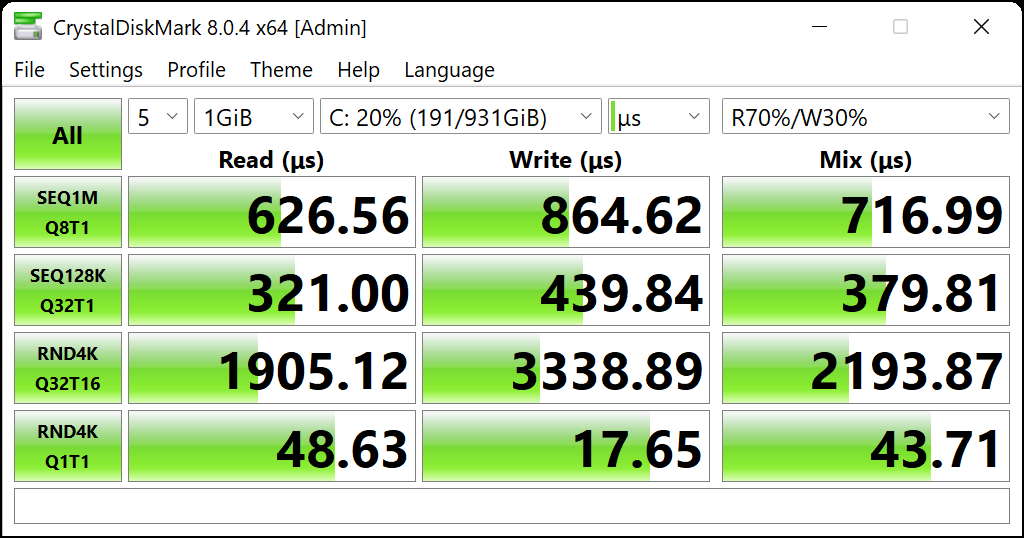
Crystal Disk Mark
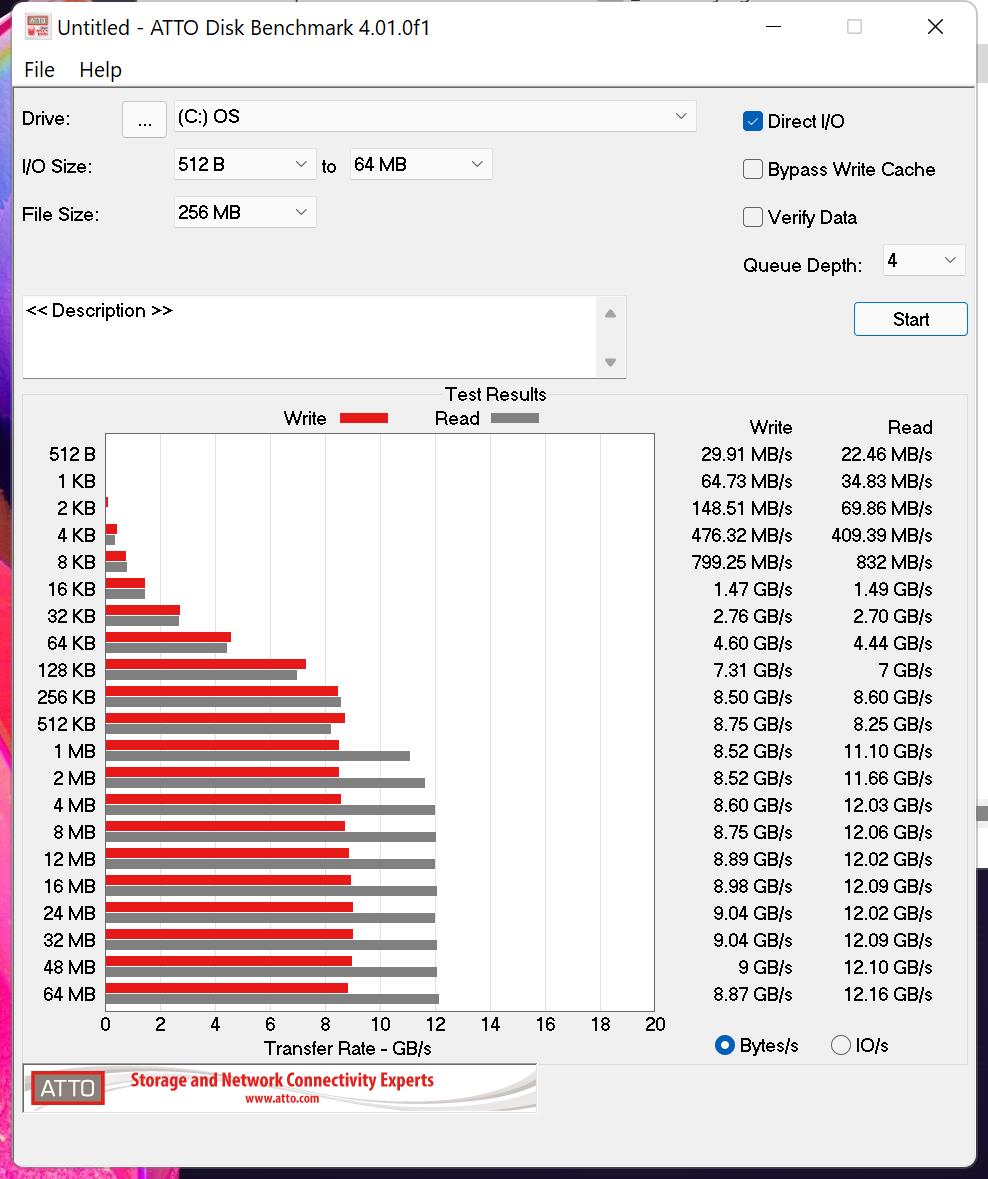
ATTO
AS-SSD
Troubleshooting
GRUB Rescue Prompt
If you get the GRUB Rescue prompt, this means the GRUB configuration in the EFI partition is invalid or wasn’t used. You can still boot by manually entering the boot parameters.
- In the rescue prompt, run
lsto see which devices are seen. You should see entries like(hd0,gpt1) (hd0,gpt2)etc. The partition numbers in this list should match with the partition numbers in your RAID. - Recall the partition number for your Ubuntu installation (i.e.
hd0,gpt7) and runls (hd0,gpt7)/. - If you see the Ubuntu installation files, run the below in the GRUB prompt, replacing
(hd0,gpt7)and/dev/md127p7with your raid partition:set root=(hd0,gpt7) linux /boot/vmlinuz root=/dev/md127p7 initrd /boot/initrd.img boot - The linux kernel should being loading.
- You will need fix your GRUB configuration file using the working boot parameters that you just performed. See [Install GRUB][#Install-GRUB] for more details.
Linux kernel loads but is dropped to BusyBox
There was either an issue running the init-premount script and your RAID array did not mount, or the root partition in the kernel command line was invalid.
- Run
cat /proc/mdstatto see if any raid arrays are mounted - If they are mounted, your root entry in the kernel command line was incorrect
- Run
mount /dev/md127p7 /rootto mount the root partition - Run
exitto exit the busybox shell and resume booting - Once booted, update the root entry in the
/boot/efi/EFI/boot/grub/grub.cfgfile in the EFI partition to match the device you mounted as root two steps earlier.
- Run
- If you don’t see any raid devices mounted, try manually executing the init-premount script.
chmod +x /scripts/init-premount/mdadm ./scripts/init-premount/mdadm- If that works, the script is not being executed properly on boot.
- If that doesn’t work, check your raid mount command, or your device layout to make sure the
/dev/nvme*devices match the names in your script. - If
mdadmisn’t found, did you forget to install mdadm aschrootearlier? You can’t proceed without it. - If this script doesn’t exist, the kernel image doesn’t contain the script needed to mount the raid array. Did you forget to run
update-initramfs?